How to Properly Screenshot on Chromebook: Essential Tips for 2025
Taking a screenshot on Chromebook is an essential skill that can greatly enhance your productivity. Whether you’re a student trying to capture important lecture slides or a professional needing to share rapid insights, knowing how to take a screenshot Chromebook can streamline your workflow. In this guide, we’ll explore various Chromebook screenshot methods, including shortcuts and tools, offering essential tips for mastering screen captures in 2025.
Mastering Chromebook Screenshot Shortcuts
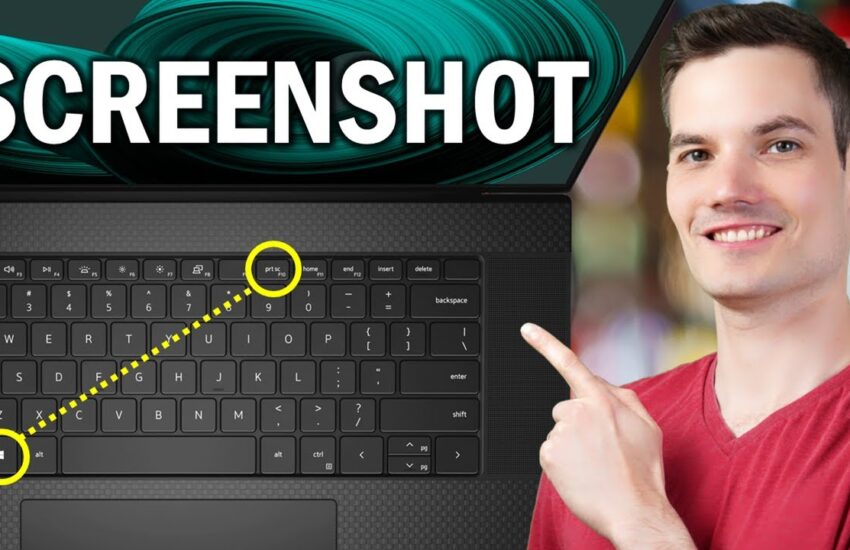
Understanding Chromebook screenshot shortcuts is crucial for anyone looking to efficiently capture their screen. The device’s keyboard is equipped with built-in shortcuts that cater to different types of screenshots. The most common method involves using the “Ctrl” key alongside the “Show Windows” key, which resembles a rectangle with two lines next to it. Pressing these keys together captures the entire screen, storing it directly in your downloads folder, which is the default location for saved screenshots on Chromebook.
Taking Screenshots with the Keyboard
When discussing how to take a screenshot Chromebook, it’s important to recognize the various keyboard combinations available. For instance, to capture a specific area on Chromebook, press “Ctrl + Shift + Show Windows”. After this, your cursor will turn into a crosshair, allowing you to click and drag to select the desired area. Once you release the mouse, the screenshot will automatically save to your device. Understanding these keyboard shortcuts can significantly reduce the time it takes to gather visual information.
Taking Screenshots Using the Stylus
For Chromebook models that support stylus input, capturing the screen can be even more intuitive. Simply use your stylus to tap the stylus icon, and then select “Screen capture”. You will be able to choose between capturing the full screen, a specific window, or a selected area. This method showcases how versatile the Chromebook screenshot tool can be, especially for users who find touch interaction more convenient than traditional keyboard input.
Capturing a Window on Chromebook
In addition to full-screen captures, capturing a window on Chromebook is another straightforward option. Press the “Alt” key along with the “Show Windows” key to take a screenshot of the current window only. This targeted approach is particularly useful for individuals working with multiple applications, as it ensures you capture exactly what you need without additional distractions in the image. This method exemplifies how to simplify screenshots on Chromebook by focusing only on critical tasks.
In summary, mastering keyboard shortcuts for screenshots on a Chromebook is fundamental for efficient screen capture. Next, let’s explore other options provided by the Chromebook operating system.
Utilizing Chromebook Screenshot Tools
The Chromebook screenshot options enable users to elevate their screen capturing experience further. In addition to physical keyboard shortcuts, several built-in tools provide enhanced control during the screenshot process. One important tool is the **scissors icon** that appears in the bottom right corner during your screen capture sessions, which can be an invaluable feature for enhanced usability.
Using the Built-in Screenshot Tool
The built-in Chromebook screenshot tool allows users to not only take screenshots but also manage different options for saving and editing. The tool can be accessed by clicking on the system tray at the bottom right corner, where users will find the “Screen capture” icon. One click on it provides multiple options: full screen, partial screen, or window capture. This user-friendly access makes it easier than ever to perform comprehensive screen captures without relying solely on keyboard shortcuts.
How to Annotate Screenshots on Chromebook
Once you’ve taken a screenshot, the next step for many users is to annotate it effectively. Utilizing tools like **Skitch** can enhance the value of your screenshot by allowing users to add arrows, text, and highlights directly over the image. This functionality is excellent for presentations, educational purposes, or simply providing clearer context when sharing images. Therefore, knowing **how to edit screenshots on Chromebook** with third-party applications can increase the quality and utility of your captures substantially.
Where to Find Screenshots on Chromebook
After taking screenshots, it can sometimes be confusing to locate your files. Typically, screenshots will be saved in the **Downloads** folder on your Chromebook. If you’re using the 2025 features, you might also find them under the “Files” application. It’s advisable to regularly organize your screenshots into folders based on subjects or projects to make them easier to access later. Thus, managing the screenshots after capture on Chromebook is fundamental in maintaining an organized digital workspace.
By utilizing the tools provided by Chromebook, users can easily enhance their overall screen capture experience. Now, let’s check out what advanced methods are available for capturing specific screen areas.
Advanced Screenshot Techniques for Chromebook
As we dive deeper into advanced Chromebook screenshot methods, it’s essential to learn about the capabilities that go beyond basic captures. Understanding how to expand your capture techniques can enhance productivity, especially if you frequently find yourself creating visual materials.
Optimizing Screenshot Quality on Chromebook
Though screenshots usually save quickly and easily, you can adjust settings to optimize the quality of your captures. Make sure to adjust your display settings on Chromebook to the highest resolution—this helps in refining how images render and significantly enhances the quality of your screenshots. Learning to maximize enhance Chromebook screenshot quality can make a considerable difference in your visual projects, especially for presentations and sharing on social media.
Using Extensions for Enhanced Features
Another method of capturing screenshots effectively involves utilizing Chrome extensions. Numerous options, such as **Awesome Screenshot** or **Nimbus Screenshot**, provide features for **screen sharing and screenshots on Chromebook**. These extensions allow users to capture scrolling pages and can offer better editing capabilities than the built-in tools. Furthermore, extensions often provide cloud save options, ensuring your captures are stored across multiple devices, making integrating screenshots with other platforms seamless.
Common Troubleshooting for Chromebook Screenshots
Sometimes, users encounter issues such as the **Chromebook screenshot not working** as expected. Common problems may arise from out-of-date software, incorrect keyboard shortcuts, or file management issues. If the screenshots fail to save, ensure that your device is up-to-date, and consider reinstalling screenshot extensions. Additionally, exploring helpful forums or the Chromebook screenshot help page can frequently resolve common queries and improve overall screen capture efficiency.
In conclusion, mastering advanced screenshot techniques can dramatically improve your workflow and presentation capabilities. Ultimately, exploring all available options can make capturing essential information feel seamless and productive.
Key Takeaways
- Learn essential Chromebook screenshot shortcuts to speed up your workflow.
- Utilize the built-in screenshots tool for flexibility in capturing images.
- Manage your screenshots effectively by saving them in organized folders.
- Optimize image quality with display settings for better results.
- Explore and utilize Chrome extensions to enhance your screenshot capabilities.
FAQ
1. How do I take screenshots on my Chromebook without keyboard shortcuts?
If you’re looking to capture your screen without relying on keyboard shortcuts, you can utilize the built-in **screenshot tool** via the system tray at the bottom right corner of your Chromebook’s screen. This tool allows you to easily choose between full screen, window captures, or selecting a specific area with a few clicks.
2. Where do I find my screenshots on a Chromebook?
Your screenshots are saved automatically to the **Downloads folder** by default. To access them, open the **Files app**, and navigate to the **Downloads** section. If you frequently take screenshots, consider creating a separate folder for easier organization.
3. Can I edit my screenshots on Chromebook?
Yes! There are numerous applications and extensions available for editing screenshots on Chromebook. You can use built-in features to annotate or employ third-party apps such as **Skitch** or **Google Keep** to add notes, graphics, and adjustments directly on your images.
4. What should I do if my screenshot is blurry?
Blurry screenshots often result from low display resolution. Ensure that your Chromebook display settings are set to the highest resolution. Adjusting the screen resolution can vastly improve the clarity of your screenshots.
5. Are there tools specifically for capturing long webpages on a Chromebook?
Indeed! Extensions like **Awesome Screenshot** or **Nimbus Screenshot** allow users to capture entire scrolling webpages. These tools provide enhanced features that the built-in method may not support, helping in situations where comprehensive layout captures are required.